If the chatbot's AI assigns a user enquiry to the wrong intent or no intent at all, or generates an inappropriate answer or no answer at all, it is helpful for the AI to receive feedback from an expert. At this point, it is important to show the AI what the correct intent would have been or what the appropriate answer would have been.
In the AI Playground menu item, the AI can be tested with queries and then optimized.
- How the AI-Playground works
- Generate responses (AI agents)
2.1 Basic response generation
2.2 Regenerate and compare AI responses - Provide feedback
3.1 Thumbs up and down
3.2 Feedback text entry - Assign resources to an agent
- Search for sources in the Playground
- Conversation history
- Expert feature: Context editor in the AI playground
The AI Playground is an extended version of the former “AI Feedback” tool and offers a compact user interface with multiple functions & transparency to optimize the artificial intelligence of the chatbot.
1. How the AI Playground works
-
The first step is to enter a sample user request.

-
The AI checks whether a suitable editorial topic or agent exists and suggests it. The title, scenario and current status of the identified topic or agent (Preview / Live) are displayed. If neither a suitable agent nor a suitable editorial topic is identified, a corresponding message is displayed. The duration of the identification process is shown in seconds in the bottom right-hand corner.
-
Clicking on the pencil icon takes you to the editor for the relevant topic or agent, where you can make adjustments. You can confirm or correct your selection of the agent or topic using the thumbs-up/thumbs-down buttons. Find out more in this chapter on thumbs-up and thumbs-down.

-
The toolbar is located at the top right.
-
You can switch channels via the channel menu.
-
Clicking on the reset icon (circle with an arrow) resets all entries in the Playground.
-
The { } button can be used to set up the context as an expert function. Further information on this can be found in this chapter on the Context Editor.
-
The three-dot menu allows you to both export and import the conversation in the AI Playground as a JSON file.

2. Generate responses (AI agents)
The core function of the AI Playground lies in generating and specifically refining the AI agent’s responses.
2.1 Basic Response Generation
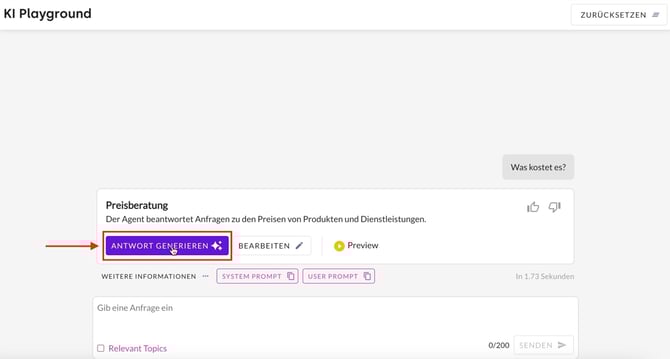
Responses are generated in the AI Playground by entering a test query into the chat window. By clicking the ‘Generate response’ button, the AI agent uses the linked knowledge resources and instructions to generate an appropriate response, just as it would be output in the live environment. This process serves as an initial check of the response quality under realistic conditions
-
The time taken by the AI to generate the response is displayed to the left of the response.

-
To the right of the answer, you can expand the list of relevant documents. This list helps you understand which resources the AI considered for this answer and which specific details were used (click the View Content button next to each resource). The list of relevant documents includes the following information:
✔️ Resource was used to generate the answer.
X Resource was considered for response generation but not used.
For each resource, the type (website, PDF, list, etc.) is also displayed, and the eye icon indicates whether the resource is accessible to users or not publicly available, depending on the resource type.

If the message ⚠️ No response could be generated appears. Insufficient knowledge in the Knowledge Base, no response will be generated. This applies to both the AI Playground and the live environment. A prerequisite for a response is the assignment of sources to an agent (details in this article). If the knowledge check is enabled in the Knowledge Base settings, disabling this feature may help to generate responses.
To ensure the best possible recognition by the AI chatbot, you should always check whether the query matches the intent of the stored topic.
By clicking on Further information, you can view previously stored feedback that was taken into account when the AI recognised the query (more information on feedback can be found in this chapter). The list of all topics/agents considered during AI recognition is also available for viewing.

-
This information appears in a list that can be accessed by clicking on Relevant topics or Feedback.


- The Bot context option plays out the context information (usually the scenario) of the topic that the AI has recognised as matching the query.

2.2 Regenerate and compare AI responses
The regeneration function enables the optimisation of AI responses through instructions and knowledge checks. This allows knowledge checks and instructions to be temporarily overridden in order to generate alternative response variants. A direct comparison of the different versions helps in selecting the optimal response for the AI agent.
-
Clicking on the cogwheel icon displays information about which knowledge checks and instructions were used for the current generation.

-
Clicking the ‘Regenerate Answer’ button opens the settings dialogue.

-
Within this dialogue, you can enter new instructions or enable or disable the knowledge check.
When regenerating, it is advisable to start by making minor adjustments to the instructions. By directly comparing the variants, you can precisely see how specific instructions influence the quality of the response.

4. The generation of a new response variant based on the changed parameters is initiated by clicking Generate response in the dialogue.
The changes made in the dialogue to the knowledge check and the instructions are temporary and initially only affect the test environment in the AI Playground. The live operation of the AI agent remains unaffected until explicitly saved.
5. You can navigate between the different response versions using the arrow icons at the edge of the response box.
6. Clicking the cog icon next to a regenerated response allows you to view the overwritten instructions used there.
7. The ‘Show original’ button allows you to switch directly between the overwritten and the original instructions. If a setting differs from the configuration currently stored in the AI agent, the following message appears: ‘This setting differs from the one currently stored in your agent.’
8. To permanently apply the successful changes to the AI agent’s settings, click the Save button.![]()
Clicking Save will overwrite the existing settings of the AI agent in the Hub. Before applying the changes, you should ensure that the new configuration is suitable for all use cases of the AI agent.
3. Provide feedback
Feedback enables continuous improvement of the AI, resulting in greater automation and more accurate responses. The outcome is an optimised user experience.
After entering a query in the AI Playground, the recognition can be corrected. The feedback is incorporated directly and influences the recognition of further queries.
3.1 Thumbs up and down
In addition to information about the topic, agent or the result that no assignment was possible, an upward-pointing and a downward-pointing thumb appear in the top right-hand corner. These symbols can be used to store the query variant as positive (thumbs up 👍) or negative (thumbs down 👎) feedback.
AI feedback is entered for agents and editorial topics according to the same principle:
- Confirm correct recognition: If the assignment or recognition is correct, simply click on the thumbs up. This will then turn green. Positive feedback can be helpful as it provides the AI with explicit confirmation that the assigned topic is correct.
- Correct wrong recognition: If the wrong agent or editorial topic has been recognised, clicking on the downward-pointing thumb opens a drop-down menu. The correct topic can be selected from the drop-down menu. Simply click on the appropriate topic and the feedback is processed when the loading bar disappears.

The AI can also be given feedback on the recognition of intents and agents in the Insights user requests (hub area statistics, focus reports user requests). This allows queries to be reported directly to the AI as correct or incorrect during an analysis. Detailed instructions can be found in this article.
3.2 Feedback text entry
Feedback can be provided after the response has been generated. The AI takes this feedback into account and implements it in future responses. The feedback option allows for greater control over the responses provided by an AI agent. Feedback can relate to both content (with restrictions) and formatting. The following steps demonstrate how this new form of AI feedback works:
- First, submit a query. The corresponding response is generated and appears in the text window.
- In the next step, the feedback can be entered in the input field below the response. The feedback is applied using the arrow or the ENTER key.

- From now on, feedback will be taken into account when generating responses.

The feedback is not intended to correct factual errors or fill gaps in knowledge. To do this, the source must always be corrected or expanded. In the AI Playground, only additions from existing resources are possible.
4. Assigning resources to an AI agent
Sources can be assigned to an agent using the search function in the AI Playground. To do this, enter a question in the AI Playground and submit it by clicking Send.

Then, generate a response using Generate response.
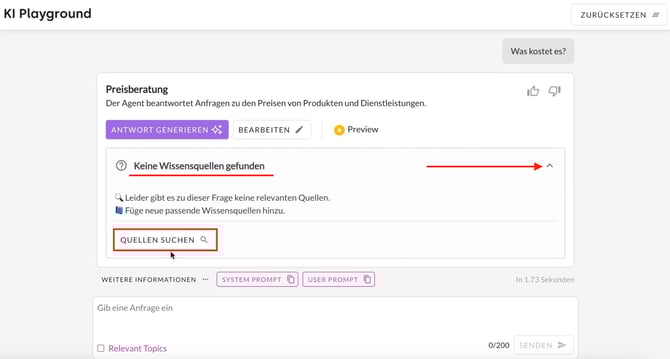
If the message No knowledge source found appears even though a source for the response is available, it can be assigned manually by following these steps:
- Use the arrow to the right of No knowledge source found to expand the area.
- Search for sources lists suitable sources in a new message.
Select the desired source from the source search results and assign it to the question using Connect. Confirm this selection with OK.

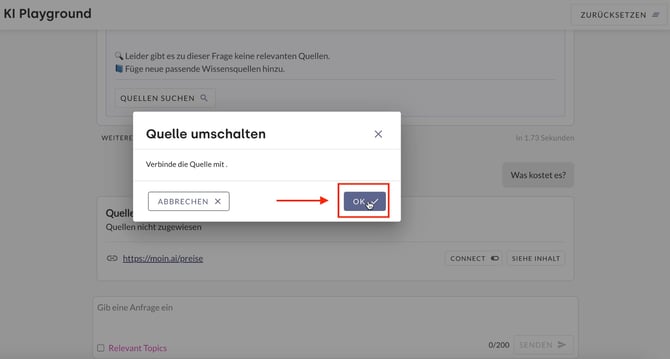
If the original question is executed again in the AI Playground, the answer is now based on the assigned source.
5. Search for sources in the Playground
The search function in AI Playground can be used to find all sources that deal with a specific topic.
To perform a source search, click on the Source search button below the input field. Then enter the desired topic in the input field and confirm by clicking Send.

All sources that address the topic are listed. A click on See content shows the content of the source that relates to the topic.


6. Conversation history
The AI Playground takes into account the full conversation history within a test session. The AI uses the same logic as in the live chatbot, ensuring that follow-up questions (e.g. “And how much does that cost?”) are answered correctly in the context of the previous message.
How it works
-
Context-based memory: The AI Playground remembers all previously exchanged content within a session. Follow-up questions (e.g. “And how much does that cost?”) are answered correctly in the context of the previous messages.
-
Simulated system start: At the beginning of each test conversation, the specified welcome message is automatically displayed to simulate the exact starting point for users.
-
Multilingual support: The AI agents also operate in the test environment in accordance with the language settings specified.
The session is automatically reset when you exit the AI Playground or reload the browser page. Reloading the webpage or clicking the reset button (circle with an arrow) in the top right-hand corner restarts the conversation from the beginning.
We recommend using the AI Playground as a ‘laboratory’ for AI intelligence alone. For a final check of the entire chatbot, including the design, functional buttons and all forms, the Preview is the appropriate environment. Access to and use of the Preview is described in this article.
Distinction: AI Playground vs. Preview
| AI Playground | Preview | |
|---|---|---|
| Main focus | AI logic & intelligence |
User experience and user interface, |
| Use case | Quick testing of prompts, recognition and context logic. | Review of the entire user experience (user journey), including design, forms and takeovers. |
| Content | AI-generated responses (text) and AI actions | All content: editorial topics, AI responses, forms, takeovers, teasers, etc. |
| Visualisation | No quick-reply buttons, no rating questions | Full visual display of the chat widget (e.g. quick-reply buttons) |
7. Optional expert feature: Context Editor in the AI Playground
The context editor is one of the optional expert features. The Customer Success team is available to answer any enquiries and provide support.
The importance of context information is continuously increasing in various use cases. Examples include the website visited, the shopping basket or a stored email address. With the context Editor in the AI Playground, these aspects can be tested and simulated with predefined and newly created variables.
7.1 Predefined variables
The following editor contexts can be defined in the AI Playground:
- widget_url: Captures the specific URL where the widget is embedded and where the conversation takes place.
- widget_host: Defines the server or domain from which the widget is loaded. This variable is usually derived from the widget_url.
Variables with a lock symbol are system values and cannot be customised.
Use Case Example based on the variable widget_url
Scenario: A camping website lists and advertises campsites across Europe. The AI chatbot answers questions depending on the respective campsite URL. For simulation in the AI Playground, a campsite URL is stored in the widget_url variable in the context editor. When asked about the price, the chatbot generates a response that refers exclusively to the information contained in the URL.
- The context editor can be accessed via the AI Playground menu item. The context editor opens via the button with the curly brackets { }.

- After selecting the variable widget_url, enter the desired URL in the Value field.

- In the AI Playground, the response is generated based on this URL.

7.2 Newly defined variables
If the predefined variables do not cover the desired editor context, a new variable can be created.
- The context editor can be accessed via the AI Playground menu item. The context editor opens via the button with the curly brackets { }.
- Clicking on Add variable opens an input mask in which the new variable is defined.


-
Variable name: Unique name of the variable (e.g. user_status).
-
Variable type: Select the data format from the drop-down menu. The options available are String (text), Number (numeric values) or JSON (structured data objects).
-
Value: The specific content to be stored for the simulation in the AI Playground.
Application example: Personalised discounts for regular guests
Scenario: A campsite operator wants to ensure that the AI agent recognises loyal customers and offers them specific benefits. A new variable is created for this in the context editor:
-
Variable name: loyalty_status
-
Variable type: String
-
Value: Regular guest
With this setting, the AI Playground simulates that the enquirer has been identified as a regular guest. When asked about pitch prices, the AI agent uses this information to automatically highlight the 10% ‘repeat customer discount’ or mention a complimentary welcome drink.
You can find more information on the topic of context within a conversation in this article.