The moinAI live chat is an integrated part of the moinAI solution and is fully activated and managed in the moinAI Hub. No separate technical integration is required. Additional information on setup, group management, and automatic translation can be found via the links provided
Live chat enables the handling of complex issues that require extensive consultation and cannot be fully resolved by the AI chatbot. A corresponding form ensures a seamless transition between automated and personal support.
The main advantages of live chat are that simple issues can be resolved automatically by the chatbot, allowing the service team to focus on more demanding enquiries. The AI chatbot either takes over the entire problem-solving process or performs the necessary pre-qualification for the service team. Direct integration into the existing moinAI system also enables a user-friendly handover to ongoing chat without changing systems and with almost immediate personal feedback.
- Roles and permissions
- Settings & structure
2.1 Automatic translation
2.2 Timeout limit
2.2 Overbooking coefficient
2.4 Group management & agent profile - Live chat console
3.1 Conversation log
3.2 User status display
3.3 Edit tools (shortcodes, files, tags)
3.4 End live chats (consequences & visibility) - Alert tones & notifications
- Statistics
1. Roles
There are two different roles with different permissions in moinAI live chat.
- Agents: Can go online or offline, close their own live chats and view their own past chat histories.
- Supervisor: They can set their status to online or offline, close their own and other live chat agents’ chats, and view statistics and all chat histories. They cannot upload shortcodes or files. This role is suitable for people who are required to assign and monitor ongoing chats.
Only chatbot owners can assign the supervisor role to other Hub accounts and upload shortcodes and documents. They do not need an additional live chat role. You can find more information about chatbot roles in this article.
2. Settings
You can access the live chat settings via the menu item Bot Settings > Livechat. The individual setting options are described below.
2.1 Automatic translation
The automatic translation of live chat messages is described in this article.
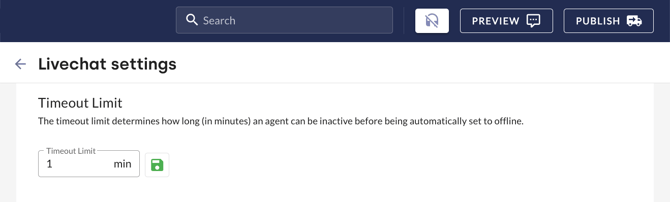
2.2 Timeout limit
The timeout limit specifies how many minutes of inactivity will cause a live chat agent to be automatically taken offline. Click on the disk icon ![]() to save the setting.
to save the setting.

2.3 Overbooking coefficient
The overbooking coefficient determines how many additional chats can be accepted as a percentage of the set maximum.
Example
Agent A has a maximum number of active chats of 4, Agent B has a maximum number of 8. If the overbooking coefficient is set to 25 %, Agent A can handle a total of up to 5 live chats, Agent B up to 10. All other live chat requests are forwarded to email takeover. Click on the disk icon ![]() to save the setting.
to save the setting.

2.4 Group management & agent profile
Group management and agent profiles determine who handles which live chats. The settings ensure that incoming chats are automatically assigned to the appropriate agents.
Group management
The assignment of agents and other aspects relating to the group management of live chat agents are described in this article.
Agent profile
Individual settings for live chat agents are configured in the agent profile. Agent profiles can be accessed via the menu item Settings > Livechat. In the Agents area, click on the pencil icon to open the respective profile. The following aspects can be configured in the agent profile:
- Edit agents: The name, maximum number of live chats and spoken language of live chat agents can be configured and defined.
- Member of the following groups: Assigned groups can be removed, added or changed.
- Deactivate agent: Live chat agents are no longer available for live chat.


Best practice: Distinguishing between humans and chatbots by customising names
To ensure maximum transparency for end users, it is advisable to make a clear distinction between automated communication via the chatbot and support provided via live chat.
In addition to the automatic chat message indicating the switch from chatbot to live chat, the label ‘generated’ displayed beneath chatbot messages indicates that a chatbot is conducting the conversation. This article explains how to configure this AI indicator.
Customising the name in the agent profile, for example, by adding ‘Advisor [Name]’, further helps to distinguish the agent from the chatbot as soon as the conversation switches to a real person. The name is automatically updated in both the chat messages and the widget header. This ensures that the person on the other end can be correctly identified at all times, even during longer conversations.
This customisation option is available not only to owners but also to live chat agents. Live chat agents can customise their name as well as their profile picture, notification sounds and spoken language(s) independently in their profile. They can access their profile by clicking on Profile > My Profile in the menu bar. The change takes effect immediately upon clicking Save.

 |
 |
3. Live chat console
The Live Chat console in the Hub enables centralised management and handling of all live chat conversations in real time. The structured user interface ensures that enquiries are assigned quickly, which minimises agents’ response times and improves service quality.
Conversations in the Live Chat console are navigated and managed via the left-hand sidebar. The ‘X’ in brackets serves as a placeholder for the actual number of entries or people in real time. This differs structurally from the standard Conversations section and is divided into the following functional areas:
-
Online Agents (X): Displays the number of agents currently logged into the hub and available for live chat.
-
Waiting to be accepted (X): Lists all newly received live chat enquiries awaiting acceptance by agents.
-
My Chats (X): Contains all conversations currently assigned to and actively being handled by the logged-in user.
-
Completed Chats (X): Provides access to live chat conversations that have already been concluded. Agents can only view their own completed conversations, whilst supervisors can view all of them.

To accept and handle a new live chat request, follow these steps:
-
Click on the Waiting to be accepted (X) section in the left-hand sidebar.
-
Select the desired conversation from the list.
-
Click on the Start chat button to move the conversation to the My chats (X) section and begin the conversation.
When integrating multiple communication channels (e.g. web widgets and messaging apps), all live chat enquiries are routed centrally to this live chat console. Enquiries are automatically assigned based on the defined groups and the languages the agents have specified. The channel from which the enquiry originates (widget, WhatsApp, English, German, etc.) is also indicated in the enquiry.
3.1 Conversation log
For new live chats, agents are shown the full chat history as well as the original form that triggered the live chat. The chat history shows where the previous chatbot conversation (the conversation log) ends and the live chat begins. The user’s form entries are transferred at this point, so that these entries can be referred to during the live chat.
In addition to the chat history and form entries, the conversation log also displays all attachments sent by users. Images, screenshots or documents uploaded to support the description of the issue appear in chronological order directly within the chat view and can be clicked on by agents to view or download. Further information on uploaded files can be found in this chapter.
3.2 User status display
Users’ current status is displayed directly within the conversation in the Hub. A coloured indicator shows whether users are online (green dot) or offline (grey dot). This makes it easier to assess availability during an active live chat.
The status is updated in real time. A change to offline usually means that the user has closed the browser tab or lost their connection.
3.3 Edit tools (shortcodes, files, tags)
The live chat console offers a range of tools to make managing conversations more efficient. These features allow you to quickly categorise chats using tags, use text templates via shortcodes, and exchange files.
Tags
Tags allow you to categorise live chat conversations and filter them by category in the statistics. You can set up any tags you like. Tags can be assigned during or after the live chat conversation has ended.
Create tag:
- Clicking on the New Tag button opens the Add New Tag window.
- Enter the tag name and tag description in the respective fields and confirm by clicking on Add Tag. The tag is listed in the Tags area.

- Clicking on the name or description of the respective tag changes the information. This is confirmed and saved by pressing the ENTER key.
Assign tag:
In live chats, tags are assigned using the Tag button below the chat input field. Tags can be assigned during or after the live chat.

Shortcodes (templates)
Shortcodes are pre-written messages. They enable live chat agents to respond to recurring messages more quickly. This improves the user experience, ensures consistent quality and partially automates live chat conversations.
Examples of use cases include greetings, farewells, recurring questions, responses with relatively static information content, etc.
The setup and use of shortcodes are described in this article.
Upload files
In addition to simple text input, both live chat agents and customers can upload files.
As a live chat agent
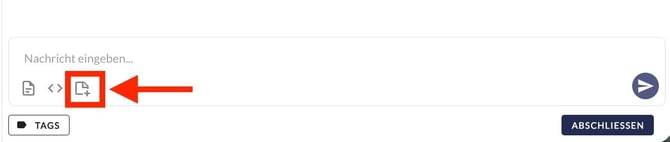
Live chat agents can only upload files that have been pre-selected by supervisors or owners. This pre-selected list can be accessed via the ‘Documents’ button in the text input field.
As a customer
This article explains which file formats are permitted for live chat agents and what needs to be borne in mind when uploading and sending files in live chat.
The permitted file formats for customers are defined in the live chat form. When customers upload files, a notification appears in the chat. By expanding the status bar, you can view and download the files uploaded by customers.

By default, customers cannot upload files in live chat. This feature can be enabled upon request by contacting the Customer Success Team at customersuccess@moin.ai.
Once file uploads have been enabled for customers, a paperclip icon appears in the text field. Clicking on this icon allows customers to upload files in the predefined formats.


3.4 End live chats (consequences & visibility)
Live chat agents can end live chats at any time by clicking the End button next to the chat input field. Once the chat has ended, the AI chatbot takes over the conversation again.
After clicking, the conversation is moved to the Completed Chats (X) section. The following role-specific permissions apply regarding access to this data:
-
Agents: Have access only to their own past and self-closed chat histories.
-
Supervisors: Can view all past chat histories for the entire team.
-
Chatbot Owners: Have full access to all closed conversations in the Hub.
4. Alert tones & notifications
An automatic notification function is integrated, which alerts live chat agents to new live chats and chat messages.
Browser notifications and alert tones from the hub must be activated in the profile. The volume and sound can be adjusted individually.

Important: System and browser settings must allow browser notifications. This article explains how to identify and resolve common issues with desktop notifications and audio alerts for new live chat conversations and incoming messages.
5. Statistics (Analysis)
The live chat statistics, which can be accessed via the menu bar, provide an overview of usage frequency and a summary of the chats that have been converted into live chats. This data can be used to optimise the AI chatbot and reduce the number of live chat enquiries in the long term.
Statistics are only visible to owners and supervisors.
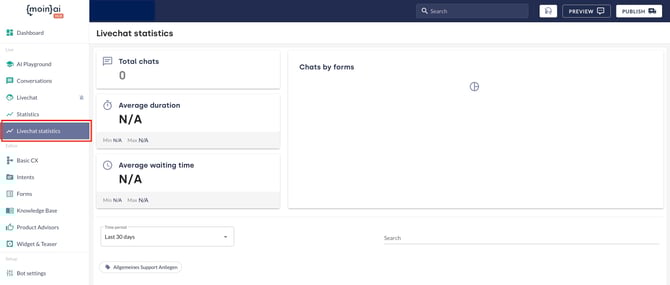
Statistics included:
- Total number of chats
- Average duration
- Average waiting time
- Number of chats by form
Live chat statistics can be disabled by the Customer Success Team at customersuccess@moin.ai if required.