![logo_moinai-full-transparent-1.png]](https://helpcenter.moin.ai/hs-fs/hubfs/logo_moinai-full-transparent-1.png?height=40&name=logo_moinai-full-transparent-1.png)
The German Accessibility Enhancement Act (BFSG) aims to make digital services and company websites barrier-free. The goal is for them to be accessible, understandable and usable for everyone.
Accessible content brings three advantages:
- Better discoverability in search engines
- Services and products reach more users
- Clearer, more intuitive operation for everyone
With moinAI, accessibility comes from four areas: the chat widget itself and three levers in the moinAI Hub.
1. Built-in features of the chat widget
The chat widget already covers part of the accessibility requirements. No setting in the moinAI Hub is needed for this.
- Colour contrasts: The controls of the chat widget use strong contrasts. How the colours chosen for a brand perform can be checked and adjusted in the widget editor, see colour contrast.
- Screen reader announcements: Changes to the state of the chat window are announced clearly, for example when it is expanded or collapsed.
- Identifiable senders: Screen readers state who a message comes from. Messages from users are announced with ‘You’, messages from agents with their name. This keeps it clear who is writing in the live chat.
2. Alt text
Alt text is short for alternative text. Alt text describes non-text content such as images or buttons. It is not visible on the page. Screen readers can read alt text aloud, which lets people with a visual impairment take in all the content.
Alt text is set in the topic editor. The graphic element is selected with the plus icon.

Image, video or slides can then be selected.

To create the alt text, the relevant settings area must be opened. For slides, a click on the 3-dot menu > Edit is enough. The input mask for the alt text then opens. A click on Save stores the change.
For videos and images, a click on Upload file is enough. The input mask for the alt text then opens. Here too, a click on Save stores the alt text.
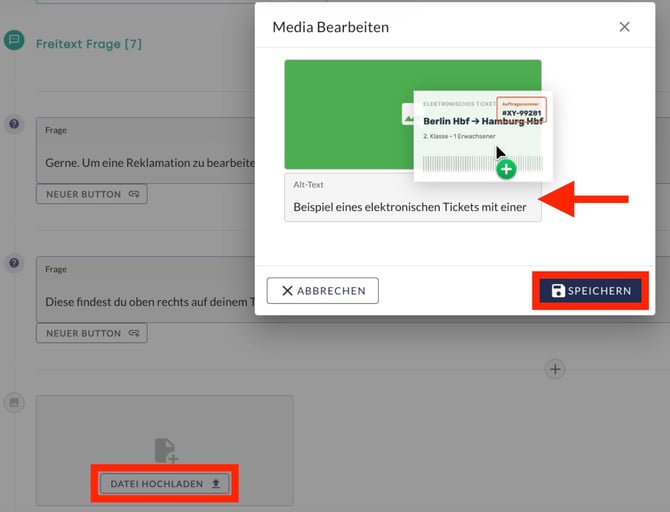 Figure: Alt text in the Edit media dialogue
3. Colour contrast
Colour contrast describes how strongly text and background stand out from each other. The greater the colour contrast, the easier the content is to take in.
- The widget editor opens via the menu item Widget & Teaser > Widget Appearance.
- In the Customize Elements section, the colour contrast can be checked and adjusted in line with WCAG 2.1. Depending on the setting selected, a note on the colour contrast appears. A click on it leads to further information about the WCAG 2.1 guidelines.
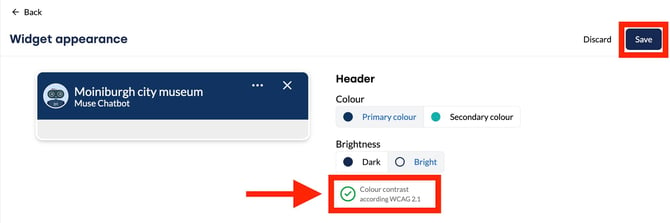
Figure: Colour contrast indicator in the widget editor
4. Plain language
Plain language is a simplified form of everyday language: short sentences, familiar words, as few technical terms and abbreviations as possible. It differs from easy language, which follows fixed rules and is aimed mainly at people with learning difficulties.
Editorial content can be written and embedded manually in plain language. For generated answers from the AI agents, plain language can be set through instructions or through the rules in the AI agent settings.
AI agents
If only certain AI agents are to answer in plain language, the instruction can be stored in the instructions of the relevant AI agent.
In the Knowledge Base menu item, the AI agent is selected, in the figure the standard AI agent. The path then runs via RAG > Instructions > Create. If instructions are already stored, the button is labelled Edit instead of Create.

The instruction window opens. The instruction is entered there, for example ‘Please formulate your answers in plain language only.’ A click on Save stores the instruction.
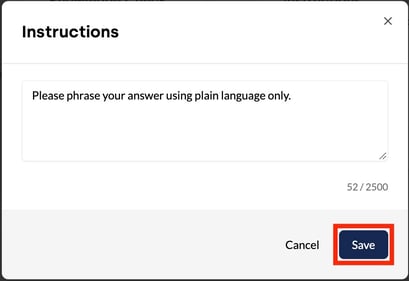
AI chatbot
Instructions apply to individual AI agents. To have the entire AI chatbot generate answers in plain language, the path runs via Bot settings > AI agent settings.
In the Rules section, the Rules activated toggle switches the function on. The new rule is then entered in the empty field or taken from the suggestions. A click on the plus icon or the Enter key adds the rule.
The rule then appears in the list of rules, where it can be deleted with the bin icon. A click on Save applies all rules to the AI chatbot.
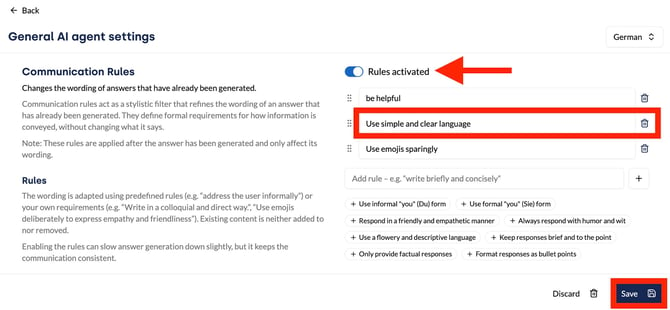
Figure: Rules in the AI agent settings
Further information is available in the article on AI agent settings.