![logo_moinai-full-transparent-1.png]](https://helpcenter.moin.ai/hs-fs/hubfs/logo_moinai-full-transparent-1.png?height=40&name=logo_moinai-full-transparent-1.png)
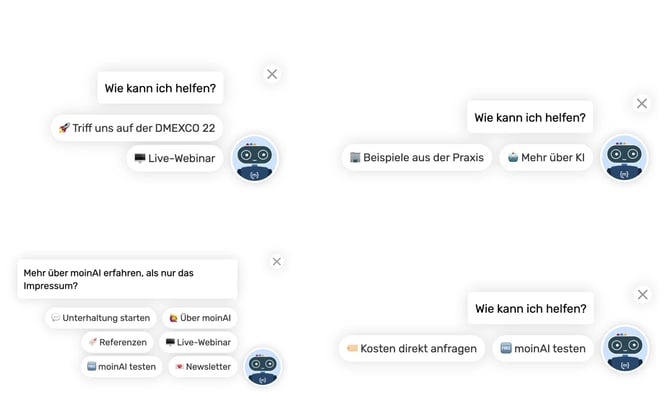
The teaser appears next to the chat widget and can be configured individually for different areas of the website. Visitors receive a greeting that matches the context of the page, along with directly relevant topics. Page-specific teasers increase engagement. A teaser can be displayed on all pages or on selected pages only.
Watch the on-demand webinar on teaser management (German only) to see how the teaser works and how to use it.
- Teaser structure
- Create a teaser
- Edit a teaser
- Customise teaser behaviour
4.1 Restrict pages for display
4.2 Delayed display (trigger)
4.3 Mobile and desktop view
4.4 Set a display schedule
4.5 Check rules with the URL tester - Quick functions in the overview list
5.1 Order
5.2 Duplicate ateaser
5.3 Activate or deactivate a teaser
5.4 Delete a teaser - Sidebar
6.1 Insights (performance measurement)
6.2 Preview
6.3 Status - Teaser behaviour after interaction and manual closing
1. Teaser structure
The teaser consists of two elements. A text message such as 'How can I help you?' draws the attention of website visitors. Action buttons suggest chatbot topics and questions that match the page.
The Ask a question action button is stored as the default button and covers any kind of question. Additional action buttons can be stored for individual subpages. These buttons display the response content of a specific topic directly or let an AI agent generate a response. When a teaser is displayed, the avatar overlays the widget icon on the website.
2. Create a teaser
New teasers are added directly in the moinAI Hub.
- Navigate to Widget & Teaser > Teaser Setup.
- Click the Add button to open the Create new teaser? window.
- Enter a name for the teaser and assign it to a channel.
Note: The name is not visible to users and serves only for orientation in the Hub. The name can be changed later in the teaser editor if required.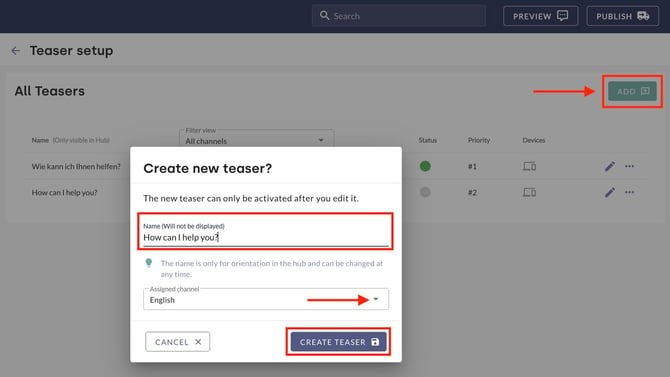
- Click Create teaser. The teaser now appears in the All Teasers list. New teasers are deactivated by default and show a grey circle (inactive) in the Status column.
3. Edit a teaser
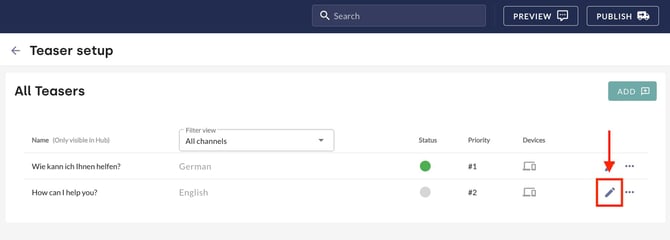
Teasers are edited in the editor. Click the pencil icon next to the teaser to open it.
-
Click on the pencil icon next to the teaser to access it.
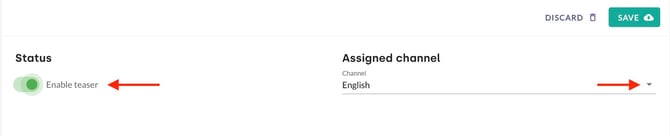
2. The Enable teaser toggle in the Status section activates or deactivates the teaser. The assigned channel can also be changed here.
Activate the teaser only after setting it up completely in the editor.
3. The teaser text and the teaser actions are defined in the Texts and actions section. The dot menu on each action card changes the order of the actions. The bin icon removes individual actions. To the left of the input fields, the preview updates to match the settings in real time.
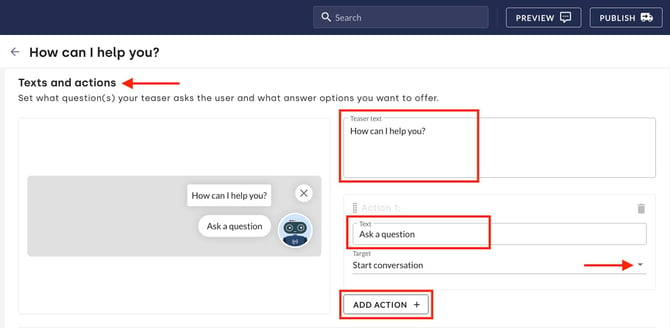
- Teaser text: The text displayed above the widget icon. The teaser text draws attention to the widget.
- Actions: Actions start a conversation with the chatbot on a specific form, topic or AI agent. Each action consists of a Text and a Target. The text appears as a button below the teaser text. When users click the button, the chat opens and the chatbot starts a conversation on the selected topic. Under Target, choose between Start conversation and all active forms, topics and AI agents.
- Start conversation: The chatbot begins with a greeting.
- Topic: The chatbot displays the response content of the topic.
- AI agent: If an AI agent is selected as the target, an example enquiry is a mandatory field. The example enquiry ensures that the AI agent gives a targeted response after the teaser button is clicked, so no enquiry goes unanswered.
- Form: The form starts and displays its first step.
Only forms, topics and AI agents that are live are available for selection.
- Click the Add action button to add more action buttons.
4. Customise teaser behaviour
4.1 Restrict pages for display
By default, the teaser is displayed on all pages that show the chat widget. Rules in the Integrations / URLs section restrict the display to specific pages.
- Activate Advanced options.
- Select the type of restriction:
- Play out on: The teaser is displayed only on pages that meet at least one of the rules in this section.
- Do not play out on: The teaser is displayed on all pages that do not meet these rules.
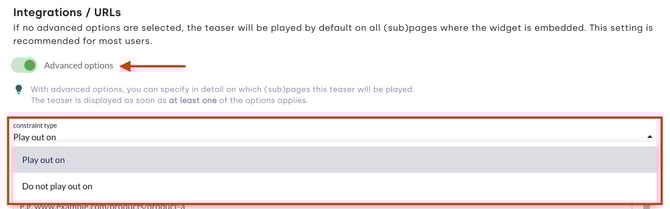
Play out on and Do not play out on cannot be combined. Define rules either for Play out on or for Do not play out on.
3. Enter the URLs for the rules.
-
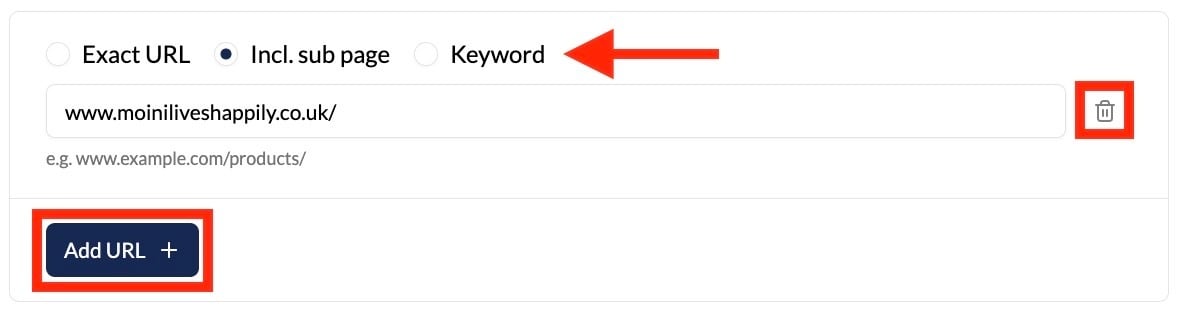
Each condition can be either an exact URL, a URL including subpages, or a keyword. For a property portal, rules could look like this:
-
- Exact URL: The condition is met when the teaser is requested from exactly this page, e.g.
www.moiniliveshappily.co.uk/renting - Incl. sub page:
www.moiniliveshappily.co.uk/renting/(also covers/renting/londonor/renting/manchester) - Keyword: The word 'property' (covers e.g.
www.moiniliveshappily.co.uk/commercial-property)
- Exact URL: The condition is met when the teaser is requested from exactly this page, e.g.
Click the Add URL button to add more URLs. The bin icon removes individual URLs.
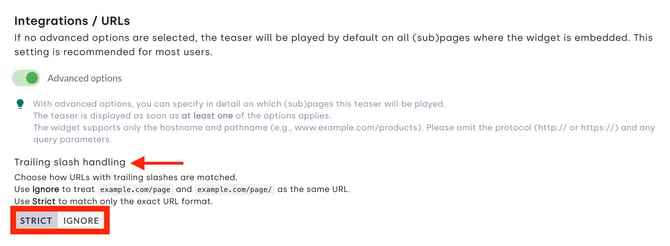
In the Trailing slash handling section, you can specify whether trailing slashes at the end of a URL (e.g. /prices versus /prices/) are ignored during the check. With Strict, the teaser appears only for the exact URL format. With Ignore, the teaser appears reliably regardless of differing URL spellings.
4. Click Save to apply all changes in the editor.
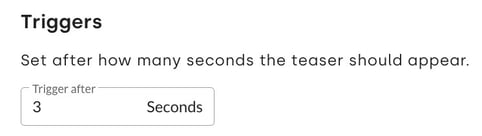
4.2 Delayed display (trigger)
By default, the teaser appears after one second. The delay can be adjusted for each teaser in the Triggers section:
4.3 Mobile and desktop view
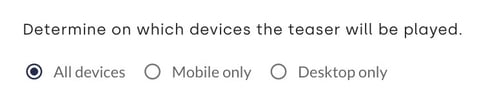
In the Triggers section, you can choose whether a teaser appears on all devices or only on the mobile or desktop version of the website.
4.4 Set a display schedule
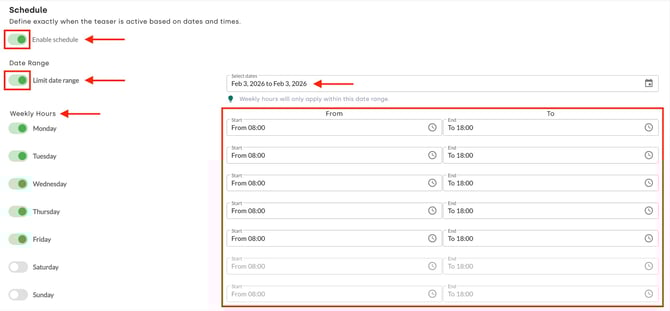
The schedule controls precisely when the teaser appears on the website. A schedule is particularly useful for matching visibility to business hours, specific campaign periods or the availability of employees for human takeover. Users are then only addressed when a timely response or relevant content is ensured.
A limited runtime is ideal for temporary notices, such as open house viewings, limited-time discounts on agency fees or trade fair announcements.
The settings are located at the bottom of the teaser editor in the Schedule section.
-
Activate the function with the Enable schedule toggle.
-
The Limit date range toggle sets a specific runtime for the teaser. Click the date field to select the desired date range.
-
In the Weekly Hours section, define for each day of the week whether the teaser is displayed. Activate a day with the toggle next to it (e.g. Monday to Friday, as in the image below). Deactivated days are greyed out.
-
For each activated day, enter the exact times in the From and To fields. Clicking a time opens a selection to help set the time span.
-
Click Save to complete the schedule configuration.
The URL tester checks whether the rules work as intended.
An active schedule takes precedence over the general activation of the teaser. Outside the defined time intervals, the teaser is not displayed, even if the general status is set to Active.
If the Limit date range option is active, the weekly schedule applies only within the defined date range. Without a date limit, the configured weekly schedule repeats continuously.
4.5 Check rules with the URL tester
The URL tester on the overview page checks whether the teaser settings take effect on specific web addresses.
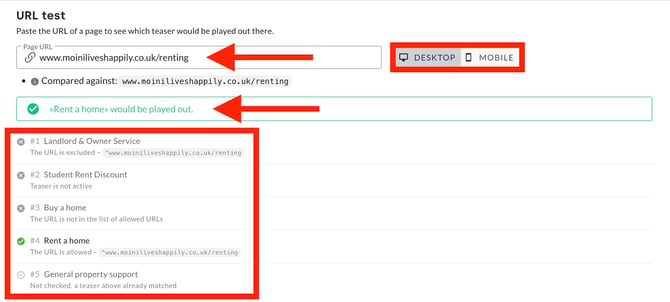
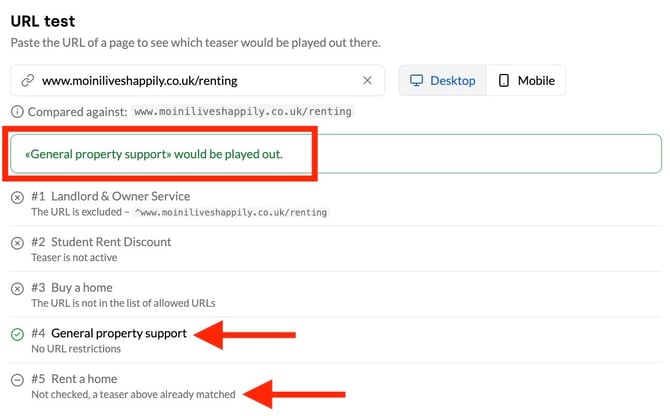
Enter the URL of the page in the test field. Then select Desktop or Mobile to check whether the device-specific and page-specific conditions are met. The URL tester then checks all active teasers one by one, from top to bottom, in their order of priority in the list. A status reason appears for each teaser:
- The URL is allowed: The criteria match, and this teaser is displayed on the page.
- The URL is excluded: The web address matches an exclusion rule defined under Do not play out on.
- The URL is not in the list of allowed URLs: The page does not meet the defined inclusion rules.
- Teaser is not active: The teaser is currently switched off or deactivated in the overview list.
- Not checked, a teaser above already matched: As soon as a teaser with a higher priority matches, all subsequent teasers in the list are ignored.
In this example, an estate agency portal tests the subpage www.moiniliveshappily.co.uk/renting to ensure tenant-specific content appears correctly:
- Landlord & Owner Service (#1): Excluded because
/rentingis explicitly set as an exclusion rule. - Student Rent Discount (#2): Skipped because the teaser is currently inactive.
- Buy accommodation (#3): Skipped because the rule only allows
/buying. - Rent accommodation (#4): Matches! The URL fulfills all conditions, so this teaser is displayed.
- General property support (#5): Not checked because the higher-priority teaser (#4) already matched.
Use case example: Testing a property portal
In this example, a property portal checks the subpage www.moiniliveshappily.co.uk/renting to ensure that rental content appears correctly:
- Landlord & Owner Service (#1): Excluded, because
/rentingis set as an exclusion rule (The URL is excluded). - Student Rent Discount (#2): Skipped, because the teaser is currently deactivated (Teaser is not active).
- Buy a home (#3): Skipped, because the rule only allows the buying section
/buying(The URL is not in the list of allowed URLs). - Rent a home (#4): Match! The URL meets all conditions, so this teaser is displayed (The URL is allowed).
- General property support (#5): Not checked, because the teaser with a higher priority (#4) already matched (Not checked, a teaser above already matched).
5. Quick functions in the overview list
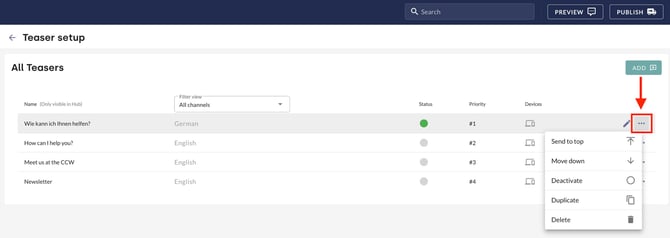
The teaser overview offers quick functions and further settings. Open them with the three-dot menu next to the teaser.
5.1 Order
The position of the teasers in the list determines their priority. The system checks the list from top to bottom: the first teaser whose conditions (URL, schedule, device) are met is displayed. All subsequent teasers are ignored.
Blocking by priority: General teasers (e.g. General property support) should always be at the end of the list. If a general teaser is placed above a specific teaser (e.g. for /renting), the specific teaser is never displayed, because the general rule matches first.
The three-dot menu changes the order with the Send to top and Move down commands.
Use case example
General property support (#4) matches first because the teaser has a higher priority. Rent a home (#5) is therefore no longer checked (Not checked, a teaser above already matched).
5.2 Duplicate teasers
In the overview list, the three-dot menu duplicates a teaser quickly and easily. The new teaser is initially deactivated, but otherwise contains all content and settings of the selected teaser.
5.3 Activate or deactivate a teaser
Once the teaser has been edited as desired, Once the teaser is set up as required, it can be activated. Activate the teaser either in the editor using the toggle or in the teaser overview list with the three-dot menu of the respective teaser. Deactivation works in the same way.
After activation, changes to a teaser do not need to be published. Clicking Save applies changes to active teasers immediately.
5.4 Delete teasers
Select Delete in the three-dot menu of the overview list to remove the teaser permanently.
6. Sidebar
The sidebar provides access to teaser insights, a preview and the teaser status. Click the teaser name to open the sidebar.
6.1 Insights (performance measurement)
Insights shows the click rate of the teaser. Learn more about evaluating teaser usage with teaser insights.
6.2 Preview
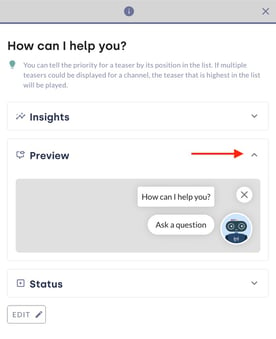
Clicking the teaser name opens the sidebar, which shows a preview of the teaser.
6.3 Status
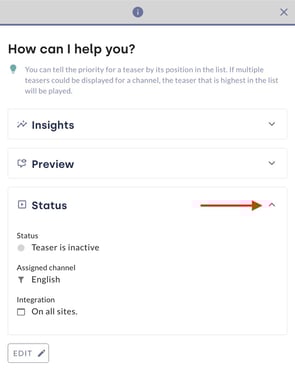
A click on the teaser name opens the sidebar. The status gives an overview of the core information of the teaser:
- the teaser status (active or inactive),
- the assigned channels and
- the pages on which the teaser is integrated.
7. Teaser behaviour after interaction and manual closing
By default, the teaser appears when a page loads. The teaser is hidden automatically as soon as users interact with the action buttons or open the widget directly. The teaser does not appear if users have previously interacted with its action buttons or opened the widget by clicking the widget icon or the avatar.
If users close the teaser manually with the close icon (X), the teaser reappears when the page is reloaded or when they switch to a subpage. This behaviour is the recommended default setting. To adapt the user experience, the closing action can be saved for a defined period. During this period, the teaser is not displayed.
Adjust the storage period
The setting applies globally to all teasers and is located in the central display settings of the widget under Widget & Teaser > Widget Display. Learn how to set the storage period in the data protection article.
Saving the close status requires that storing user data in the widget is permitted. If this requirement is met, the relevant users see no further teaser for the defined period.