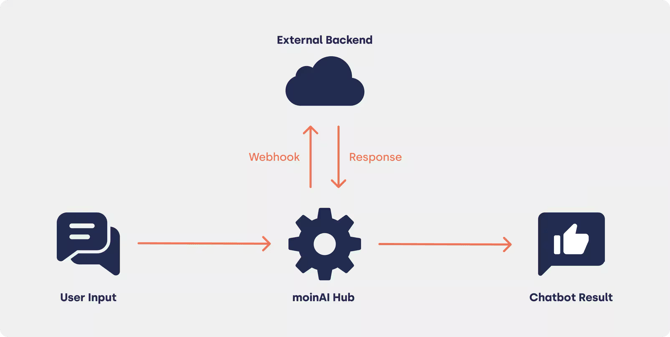
Webhooks enable real-time communication between different applications. In this process, one server (the sender) automatically sends an HTTP enquiry to another server (the recipient). In the context of moinAI, this means that data collected in the chat is transmitted to an external system, or information is retrieved from there, so that it can be displayed to users directly within the chat widget.
The prerequisites for using a webhook are an existing form or an AI agent in the Hub and an accessible target URL (API endpoint) for the external system.
-
2.1 Technical configuration
2.2 Advanced options (cookies & authentication)
2.3 Webhook actions before execution -
Use in chatbots
3.1 Webhooks as AI actions
3.2 Webhooks in forms
1. Benefits and functionality
The use of webhooks allows the AI chatbot to be seamlessly integrated with third-party systems such as CRM tools, product databases and e-commerce platforms. This offers the following benefits:
-
Automation: Processes such as booking appointments or checking order statuses take place directly within the conversation, enabling self-service interactions
-
Flexibility: Any REST webhooks can be integrated without the need for code modifications.
-
Contextual relevance: Information from the ongoing conversation is fed directly into the API query, e.g. customer status, current subpage or product interest.
2. Create webhook
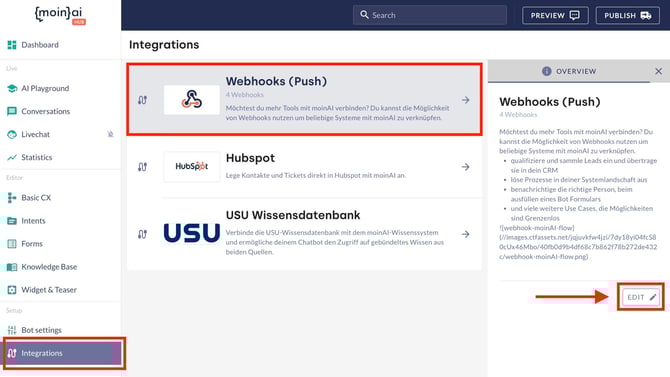
- You can access the overview in the Hub via the menu item Integrations → Webhooks (Push).
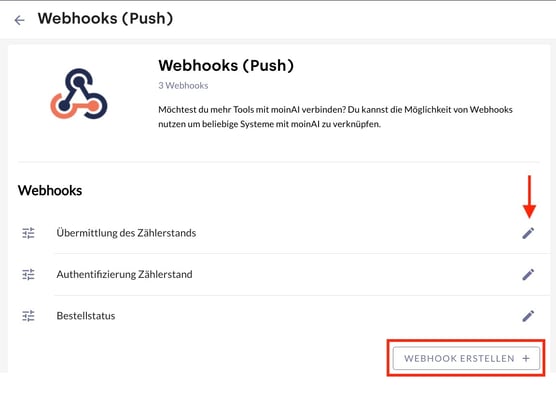
- Click the Edit button to open the list of existing webhooks.
- The Create webhook + button opens a new, blank form.
- Existing webhooks can be customised using the pencil icon.
- By clicking the Deploy button at the bottom/top right of the webhook editor, the webhook becomes available in both the preview and live environments and can be linked to AI agents or forms.
2.1 Technical Configuration
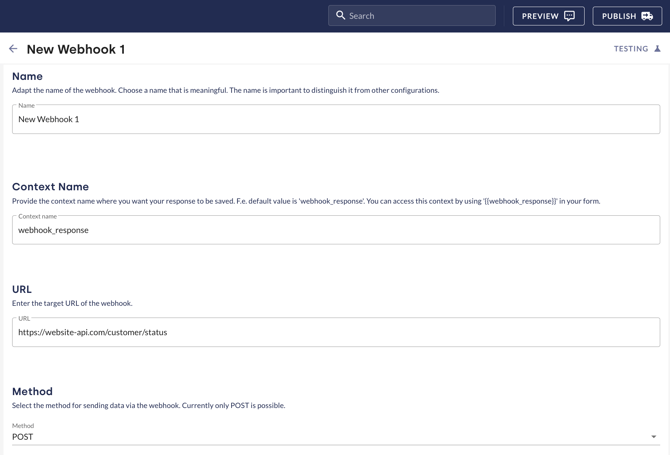
The basic settings for the interface are defined in the edit view.
-
Select a name: A custom name used for internal identification within the Hub. The name can be easily changed at any time.
-
Define context name: The API response is saved in the dialogue under this name. It is also possible to use the context name elsewhere as a reference, e.g. via handlebars. For this reason, the name should remain as consistent as possible, otherwise every link will require manual adjustment.
-
Enter target URL: The API address to which the data is sent. This can be an internal or external API. Handlebars can also be used here, so that the URL is not static but can be used dynamically.
-
Select method: Specify the HTTP method by which the webhook sends the data. By default, POST is used to send data and GET to retrieve it.
Dynamic placeholders (Handlebars)
Handlebars (the curly brackets {{...}}) act as dynamic placeholders. In the Hub, they are used to specify where the chatbot should insert information that is generated by users only at the moment of the conversation.
For instance, handlebars templates can be used to dynamically integrate values from the dialogue context into the target URL.
Example: https://api.beispiel.de/v1/orders/{{orderId}}/status. Here, orderId is replaced by the user’s actual entry.
2.2 Optional: Advanced options (cookies & authentication)
For specialised requirements, the editor offers additional control options:
-
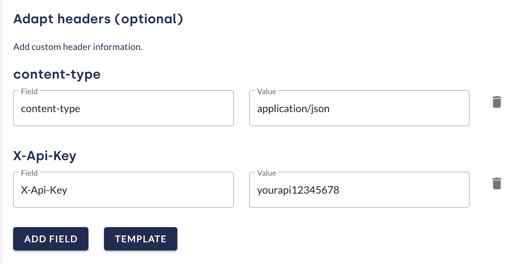
Customise headers: Using the Add field option, you can define custom headers (e.g. content-type: application/json) to be sent with the enquiry to the API. Alternatively, you can load a standard set using the Template option. A typical example is the X-Api-Key for authenticating the enquiry. Here, any number of headers can be configured to meet the requirements of the target API.
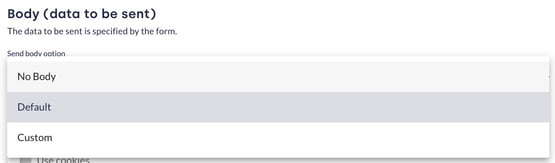
- Body: The options are Default, Custom and No Body.
-
- Default: Time-saving consolidation and transmission of all information from a conversation in a single package. Due to frequent data overload and incompatible formats, its use with POST methods is not recommended, as interfaces (APIs) require precise data structures.
- No Body: This option is selected when no message content is required for the enquiry. This is the default for GET enquiries, where data is retrieved exclusively via the URL.
- Custom: This option allows for customisation of the body, enabling specific data to be sent to the API. This is particularly useful when more complex data structures need to be transferred. The body is configured in JSON format. Using handlebars, information from the dialogue context can be specifically accessed to integrate dynamic information such as customer data or responses.
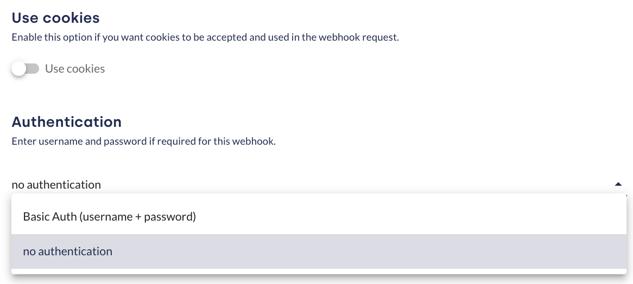
- Use of cookies: Enabling this option means that cookies in the webhook request are accepted and used by the target system. This is particularly important for maintaining sessions across webhook calls. In the standard configuration, these cookies do not raise any data protection concerns. More information on data protection is provided in this article.
- Authentication: Here, you can choose between No authentication (security is handled, for example, via an API key in the header) and Basic Auth (request for username and password).
Security and protection against misuse (recommendation)
-
API key and JWT: Using an API key in combination with a JWT provides an additional layer of security. The API key is included in the header, whilst the JWT ensures that the enquiry is authenticated and made within a specific timeframe.
-
TLS/SSL encryption: All data transfers should be carried out via HTTPS to ensure that the data is encrypted during transmission and cannot be intercepted by third parties.
Each webhook configuration and API is tied to a specific use case. Separate webhooks must be set up for different functions (e.g. a product search via the Salesforce ProductSearch API and ticket creation via the Salesforce Ticket API). However, it is possible to combine multiple webhooks within a single form.
JWT (JSON Web Token)
You can think of a JWT as a digital festival wristband. Once obtained, it serves as proof for the rest of the process that the person has already been successfully verified.
2.3 Webhook actions before execution
Optionally, actions can be enabled that are executed immediately before the webhook is sent:
-
User Message History: Adds the conversation’s message history to date to the context. This is useful if the target system (e.g. a CRM) requires the full conversation context for further processing.
-
Save File URL(s): Saves the URLs of files that users have previously uploaded in the chat to the context. This is essential for processes where documents or images need to be transferred to a backend.
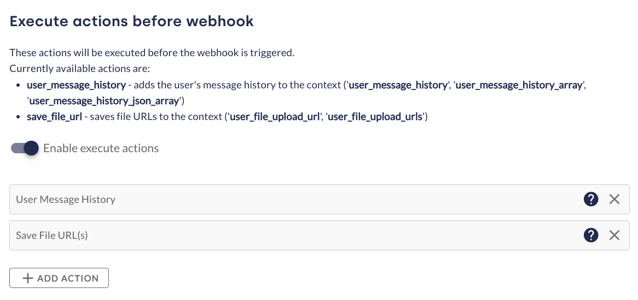
Clicking on the question mark opens a window with further information about the respective webhook actions.
3. Use in chatbot
Once a webhook has been configured, it can be used in various places within the chatbot.
3.1 Webhooks as AI Actions
AI actions enable the AI agent to initiate a query independently when required.
-
Go to Knowledge Base → RAG → and click Add Action + in the Actions & Follow-Up card to create a new action.
-
The link is established by selecting the previously created webhook under Choose tool.
-
Thanks to precise parameter descriptions, the AI agent knows which information (e.g. an ID) it needs to request in advance.
More information on AI actions can be found in this article.
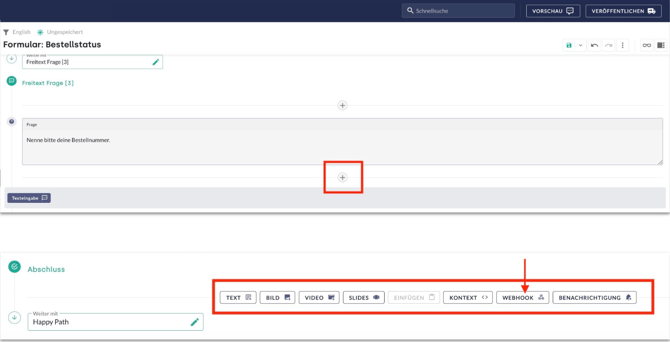
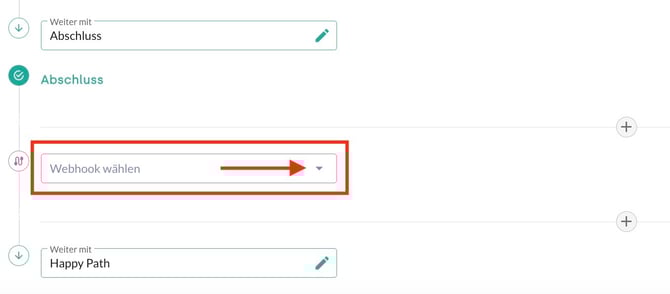
3.2 Webhooks in forms
In forms, integration takes place at a fixed point in the query path.
-
In the form editor, click the plus icon at the desired location.
-
Select Webhook from the element bar.
-
Choose the desired webhook from the field that appears.
You can find more information about forms in this article.
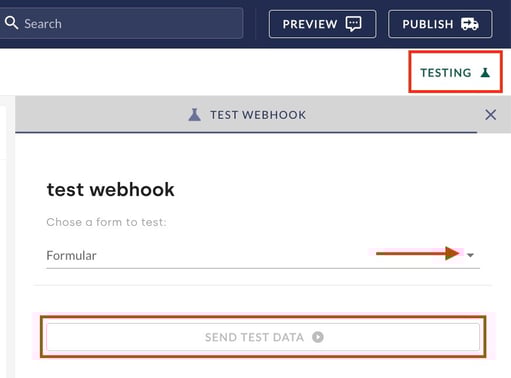
4. Testing and Validation
To ensure correct functionality, each configuration should be tested.
-
Click the Test button in the top-right corner of the webhook editor to open the test environment.
-
Select a form for simulating the database.
-
Click Send test data triggers the enquiry and validates the API’s response.
-
You can also validate the function in the preview (for webhooks in forms) or in the AI Playground (for webhooks in AI actions). The AI Playground shows in detail how an AI action was executed.
5. Practical Examples
|
Use Case |
Method |
Benefit |
|
Order status |
POST |
Authenticates users and returns the current delivery status. |
|
Meter reading |
POST |
Securely transmits collected consumption data to the service provider’s backend. |
|
Product search |
GET |
Searches external catalogues (e.g. Shopify) based on keywords. |
|
Seminar availability |
GET |
Checks whether there are still places available using a seminar ID and returns the result to the chatbot. |
Tutorial: Check order status (click to expand)
Checking the order status is one of the most common customer enquiries in e-commerce. As queries such as "Where is my order?" account for a large proportion of support volume, using a webhook to integrate with the shop system allows for an automated response to be generated. This informs users of the current status of their order or delivery without the need for manual intervention by customer service. As users often use the terms "order status" and "parcel tracking" interchangeably, this example covers both areas. The webhook sends a request to the shop system, retrieves the current order and delivery status, and the AI chatbot provides the relevant information.
What you will need:
- 1x data retrieval form
- 1x access to the shop system's API (e.g. Shopify, Shopware)
- 1x webhook for data updates to transmit the order status; in this example, it has the context name `order_status_response`
Each shop system outputs data in different formats. The code examples shown here must therefore be adapted to the specific variable names used in your own system.
1. Structure of the query process
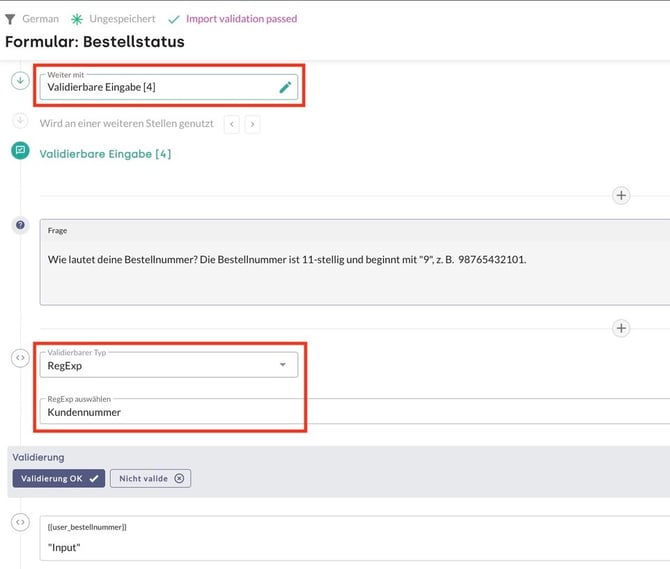
To retrieve information from a shop system, the order is usually identified using two specific details: the order number and the email address. The process is divided into the following steps.
- Querying the order number: Retrieving the unique identification number of the order. Validation using RegExp (Regular Expression) is optional.
- Querying the email address: Additional validation to ensure compliance with data protection standards, including email format validation.
- Execution of the webhook: Transmission of the data to the shop system.
- Generating the response: Dynamic creation of the message based on the values returned by the system.
2. Configuring the webhook
To communicate with the shop system, a new webhook is created in the Integrations → Webhooks (Push) section.
- URL: https://api.your-shopsystem.de/v1/orders/{{orderId}}/status
- Method: POST (or GET, depending on API requirements)
- Context name (example): order_status_response
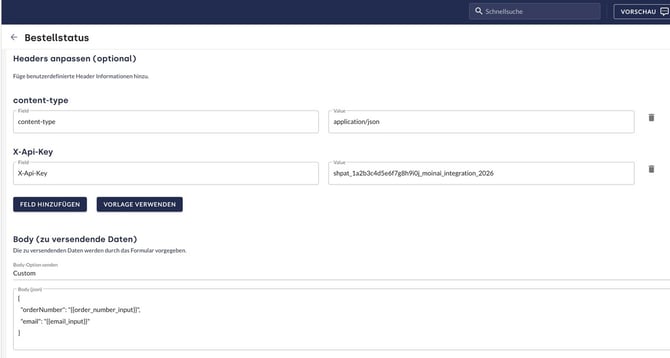
- Headers:
- X-Api-Key: <Dein-API-Key deines Shopsystems>
- Content-Type: application/json
- Body (example) in JSON format:
{
  "orderNumber": "{{order_number_input}}",
  "email": "{{email_input}}"
}
3. Optional: Authentication via login (alternative to email verification)
The enquiry process can be optimised through automatic identity recognition. If a person is already logged into their customer account, there is no need to manually enter their email address. In this case, only the order number needs to be entered to retrieve the dispatch status.
Form design with the conditional switch
The Conditional Switch element in the form is used to control whether a login is present or not.
- Select the element conditional switchin the form editor.
- The editing screen is opened via the three-dot menu behind a condition.
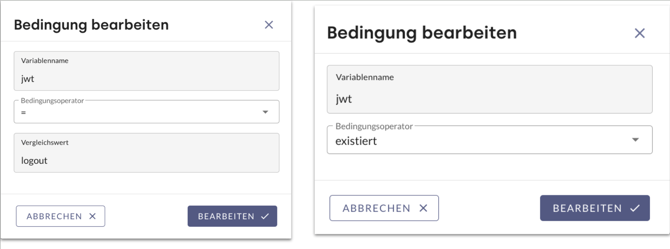
- In the Edit condition screen, the variable name, the condition operator and the compared value are defined.
- Click Edit to save the condition.
- The plus icon can be used to add further branches to map different login states.
The following three conditions are recommended for precise control:
- jwt = logout: This status indicates that the user was previously logged in but the session has ended. A message is displayed here with a link to log in again.
- jwt exists: The user is successfully logged in. The form immediately redirects to the order number query.
- uniqueUserId exists: This condition serves as a fallback if no authentication is present. The user is prompted to log in.
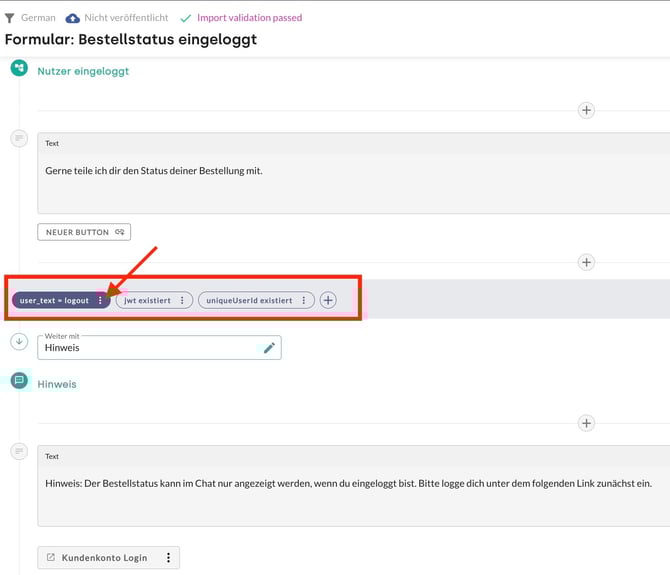
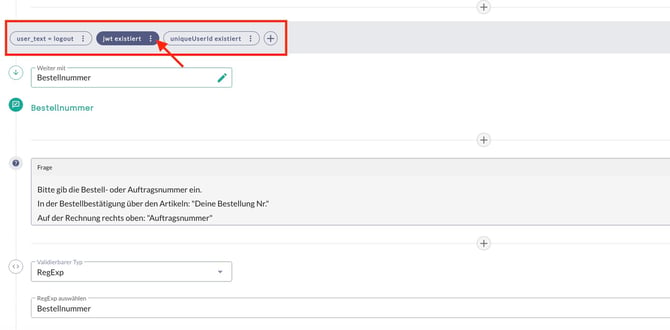
Variable names as jwt must be written exactly as they are passed by the external system (e.g. Shopify). Any deviation in spelling will cause the condition to fail.
The variable uniqueUserId must be written exactly as they are passed by the external system (e.g. Shopify). Any deviation in spelling will cause the condition to fail.
JWT (JSON Web Token)
A JWT can be thought of as a digital festival wristband. Once received, it serves as proof for the rest of the process that the person has already been successfully verified..
Webhook configuration for login authentication
To ensure the shop system recognises that the request originates from a previously verified person, the security token (JWT) must be included in the webhook.
This is done in the webhook configuration under Customise headers (optional):
- Field: Authorization
- Value: Bearer
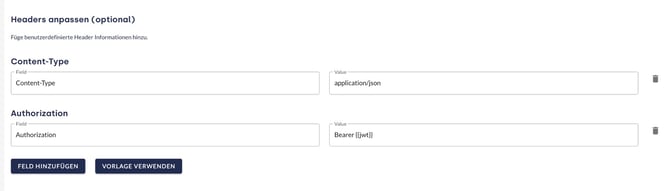
Zweck dieser Konfiguration: Durch diesen Header weist sich der KI-Chatbot gegenüber der API als autorisierter Vertreter der eingeloggten Person aus. Das System erkennt das Token und gibt die Bestelldaten frei, ohne dass eine zusätzliche E-Mail-Validierung im Chat-Verlauf notwendig ist.
4. Logic of the response message (handlebars)
To respond to different return values from the system (e.g. 'cancelled', 'processing', 'shipped'), Handlebars templates with if statements are used in the form's text block. This translates technical status descriptions into customer-friendly text.
Example of a code snippet for the status response:
{{#if shopify_order_status_url}}

{{#if shopify_shopify_fulfillments}}

{{#if (eq shopify_status "pending")}}

Your order has been processed but has not yet been dispatched.{{/if}}
{{#if (eq shopify_status "open")}}

Your order has been dispatched.{{/if}}

{{#if (eq shopify_status "success")}}

Your order has been confirmed.{{/if}}

{{#if (eq shopify_status "cancelled")}}

Your order has been cancelled.{{/if}}

{{#if (eq shopify_status "error")}}

There was an error with the delivery.{{/if}}

{{#if (eq shopify_status "failure")}}

Something went wrong with the delivery.{{/if}}

{{else}}

Your order has not yet been dispatched.{{/if}}

{{else}}

There is currently no order matching your details. Please check your details again or check the order status page:{{/if}}
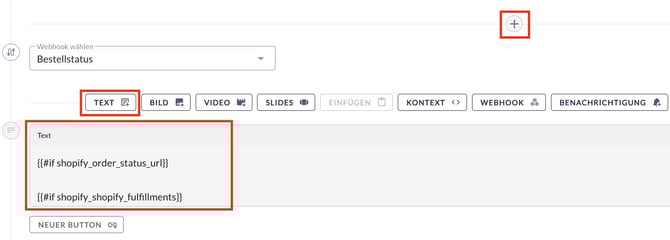
Every shop system outputs data in different formats. The code examples shown here must therefore be adapted to the specific variable names used by your own system.
5. Dynamic buttons and fallbacks
In addition to the text block, you can use buttons that change their behaviour based on the webhook result. This is particularly useful for linking directly to the shipping provider's (e.g. DHL) tracking service.
- Conditional button text: The button displays "View shipping status" only if a parcel has been dispatched. Otherwise, a generic text such as "Order status" appears.
{{#if order_status_response.tracking_url}}Track shipment{{else}}Go to customer account{{/if}}
- Conditional button URL: The link leads either directly to the tracking URL or, as a fallback, to a general FAQ page or the customer account.
{{#if order_status_response.tracking_url}}{{order_status_response.tracking_url}}{{else}}https://yourshop.com/login{{/if}}
This logic ensures that users are always offered a helpful next destination (fallback to the customer account or FAQ) if no tracking number is yet available.
Such conditions are implemented in buttons using Handlebars syntax within the button text and button URL.

Every shop system outputs data in different formats. The code examples shown here must therefore be adapted to the specific variable names used by your own system.
6. Best Practice: Authentication and Security
As an additional security check, the order status query can be linked to the user's login status. By using contextual information, it is possible to check whether a user is already logged in.
-
Precise validation: Using RegExp for the order number (e.g. checking for 11 digits and a leading digit of '9') minimises faulty API calls and improves the user experience.
-
Security check: The combination of order number and email address serves as verification.
Tutorial: Look up course availability (click to expand)
Searching for seminars or courses is a key priority for educational providers and sports facilities. To provide users not only with static information but also with real-time availability, data can be retrieved either directly from a third-party system or via a two-step process (CSV search + webhook), depending on the technical infrastructure.
What is required:
- 1x AI agent with an assigned knowledge source (e.g. CSV file for course data)
- 1x webhook for live queries (e.g. availability or weekly schedule)
- 1x AI action to link query, knowledge and webhook
Technical webhook configuration:
- URL: https://sport-is-fun.com/api/moin/weekly-plan
- Method: GET
3. Configuring AI actions
To enable webhooks in the conversation flow, they must be defined as a tool within an AI action. More information on AI actions is available in this article.
- Create action: Under Knowledge Base → RAG button → Add Action, a new AI action is created.
- Select tool: Select the previously created webhook (e.g. "Course search" or "Weekly schedule") from the drop-down menu.
- Define instructions: In the "Instructions before" and "Instructions after" fields, you specify how the AI agent should inform users (e.g. "I'll just check for available places...").
Additional configuration for Approach A
When working with a CSV file (Approach A), two further webhook configurations are required:
4. Set parameters: Parameters must be defined so that the agent can pass the correct information from the CSV to the webhook.
Example configuration:
- Column name in the CSV: SORT_NUMBER
- Parameter in the AI action: A parameter named SORT_NUMBER (type: number) is created.


- This parameter is then entered into the webhook URL from the webhook configuration and into the generated seminar URL: https://api.example-provider.de/v1/availability?seminarNo={{SORT_NUMBER}} and https://example-company.com/seminars/{{SORT_NUMBER}}.
5. In the instructions of the AI action, the agent is instructed:
"If you have found seminars, always perform a seat availability search". The agent then takes the value from the CSV column SORT_NUMBER of the found "Plattdüütsch seminar" and inserts it into the webhook URL.
Why does Approach B not require any parameters?
In the case of a direct timetable query, the webhook simply retrieves the entire timetable updated daily. As there is no need to 'filter out' a specific ID from a file here, there is no need to set up parameters in the AI action at all.
Detailed instructions on the general definition and setup of AI actions, as well as on parameter control, can be found in this article.
4. Decision guide: Choosing the right approach
The choice between a direct query and a two-stage search depends primarily on the existing IT infrastructure.
Advantages of the two-stage search (Approach A):
- Protection of the interface (API): Thanks to the preliminary check in the knowledge base (CSV file), the webhook is only triggered if a valid match (e.g. an ID or a product) has been found. This prevents erroneous requests to the backend and conserves server resources.
- User convenience through data mapping: Users can search using natural language (e.g. for a course name). The AI handles the translation into technical parameters required by the database in the background. Users therefore do not need to know complicated item numbers or IDs.
- Precise error handling: If the AI finds no match in the knowledge base, the process is terminated prematurely. Instead of displaying a technical error message from the server, the chatbot can provide a clear response directly (e.g. "Unfortunately, I haven't found a relevant entry for that").
When is the direct query (Approach B) appropriate?
The direct query is recommended when the system already provides optimised data (such as up-to-date daily schedules) via an interface and additional filtering via a list is not necessary.
Tutorial: Submit meter readings (click to expand)
Submitting meter readings is a standard self-service process for energy suppliers. As this involves changes to contract-related data, the process is implemented using a two-step security procedure within a single form. The AI chatbot acts as an interface, receiving data, sending it to the backend for verification, and only applying the final change once the plausibility check has been successfully completed.
What is required:
-
1x data retrieval form
-
5x webhooks
-
Authentication: Verification of customer data for identity checks
-
Meter query: Retrieval of the active meter and the associated contract
-
Validation check: Technical check in the energy supplier's database to verify whether the entered value is realistic
-
Meter reading submission (standard): Transmission of a plausible value
-
Meter reading report (discrepancy): Transmission of an implausible value including justification
-
Summary of the process
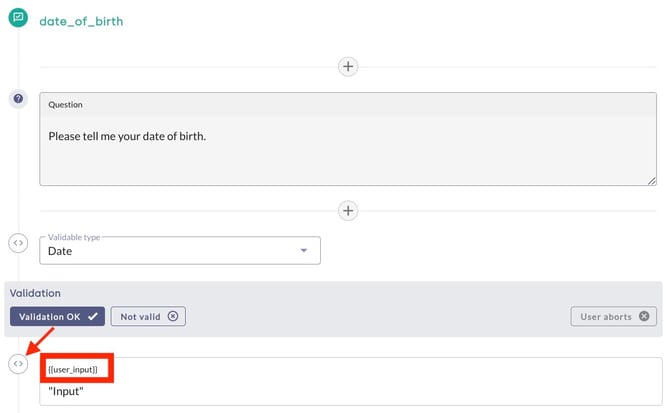
Phase 1: Identification and authentication
First, the customer number and date of birth are requested in the form. This data is sent to the backend via the first webhook (authentication). The system checks for a match and returns a 'security ticket' (JWT), which is stored in the auth_response context.
Phase 2: Data collection and transmission
Once the verification has been successfully completed, the AI chatbot requests the meter reading. Only now is the second webhook (data update) triggered. This 'message' to the company now contains both the new meter reading and the security token from the first step (auth_response) to authorise the request.
Phase 3: Completion and Feedback
The company processes the meter reading and sends back a success message, which is stored in the context customer_update_response. The AI chatbot uses this information to display a final confirmation to the user in the widget.
1. Data collection
First, the customer number and date of birth are requested. These fields are linked to variables in the form that act as placeholders. The date of birth serves as verification for the change in the backend. If the customer number does not match the date of birth, the process is aborted and the customer is notified. If there is a match, the information is stored in the Webhook Handlebars variable (user_x in square brackets) and the process continues. In the form, the input fields are linked to the variables, which function like empty boxes. The variable names are defined within the curly brackets.
-
Variable 1: user_customer_number
-
Variable 2: user_date_of_birth
It is recommended that you choose meaningful names for variables to make it easier to map them in Handlebars templates. You can change the name in the form using the < > icon next to the relevant variable.
To prevent incorrect entries, we recommend using the validatable input element. For example, a RegExp format can be used to ensure that the customer number is exactly 11 digits long and contains no special characters.
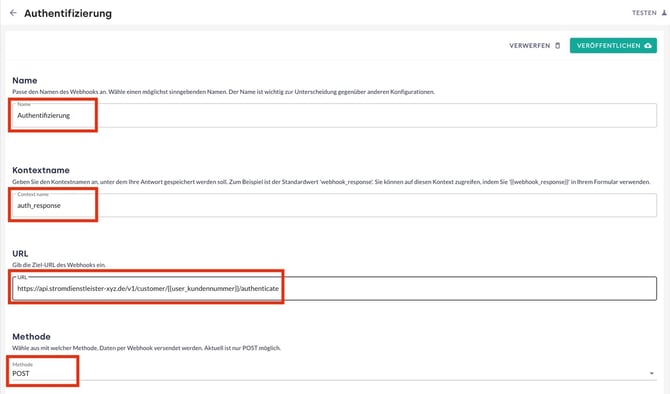
2. Authentication (first webhook)
| ⚙️ What happens: | The chatbot checks the customer number and date of birth. |
| 🎯 Objective: | To ensure that the person is actually a customer. |
| ✅ Result: | The chatbot receives the 'security token' (JWT) for the rest of the process. |
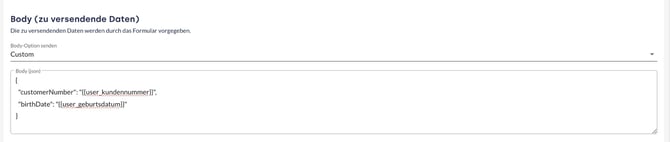
As soon as the input is available, the first webhook is triggered to check authorisation for changes to the contract. In this example, the webhook has the context name auth_response. As soon as the input is available, the first webhook is triggered to check authorisation for changes to the contract.
-
Context name: auth_response
-
URL: https://api.energysupplier.com/v1/customer/{{user_customer_number}}/authenticate
-
Method: POST
-
Body: Custom
{
"customerNumber": "{{user_customer_number}}",
  "birthDate": "{{user_date_of_birth}}"
}
If the URL is to include a dynamic component, such as the customer number, this can be incorporated using Handlebars.
-
Static target URL: https://api.energysupplier-xyz.com/v1/customer/authenticate
-
Dynamic target URL: https://api.energysupplier-xyz.com/v1/customer/{{user_customer_number}}/authenticate
What actually happens when triggered (example):
If users enter the number 12345 and the date 01/01/1980, the "message body" that the webhook sends to the system looks like this:
{
  "customerNumber": "12345",
  "birthDate": "01/01/1980"
}
The system's response
After the data has been entered, the first webhook checks the user's identity against the company's backend. The subsequent process is controlled via a conditional switch element:
-
Path A (Error): If the verification fails (e.g. incorrect combination of customer number and date of birth), the variable webhook_error is set. The AI chatbot displays a message such as "Authentication unsuccessful". To give the user another chance to enter the correct details, the form is not terminated at this point, but redirected back to the start of the data collection process via a link (restart).
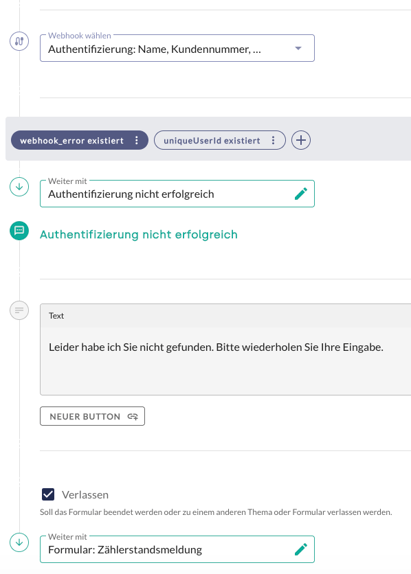
-
Path B (Success): If authentication is successful, the security token is stored in the context under the context name auth_response.
The variable uniqueUserId is automatically provided by moinAI and contains an anonymous identification number for each user. As every person in the chat must have such an ID, this condition is always met. It is therefore ideal as a fallback path within a conditional switch.
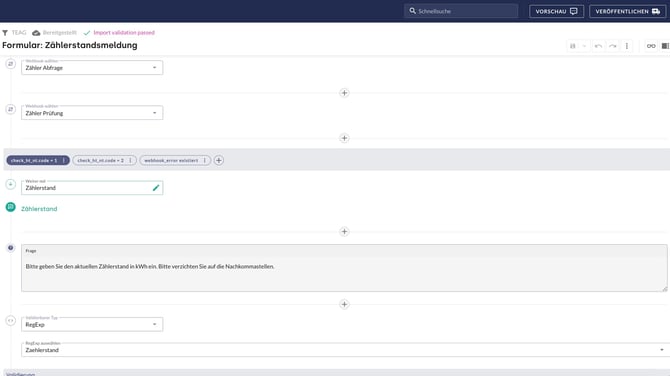
3. Querying the meter reading (second webhook)
Before a meter reading can be reported, the AI chatbot must find out which meter and which contract are currently assigned to the user.
| ⚙️ What happens: | The chatbot asks: "Which meters belong to this person?". |
| 🎯 Objective: | To obtain the active meter and the associated contract. |
| ✅ Result: | A data package containing the specific meter details (e.g. meter number, tariff type) in the background. |
Purpose: In this step, the chatbot receives information on whether the meter is a single-rate or dual-rate meter (HT/NT). This is a prerequisite for the form to display the correct input fields in the next step.
The webhook is configured as follows:
-
Method: GET
-
URL: https://api.energysupplier-xyz.com/portal/app/meter-reading.
-
Body option: Default (no individual body is required for GET requests).
Special features of authentication: Unlike the subsequent update, this webhook does not require a JWT in the header. Instead, two other security mechanisms are used:
-
Use of cookies: The Use cookies option is enabled to utilise the existing session from authentication (Step 1).
-
Basic Auth: The username and corresponding password are stored under the Authentication section to authorise access to the customer portal.
Result: The system returns a large data object (JSON) containing information on all contracts and meter numbers. This data serves as the basis for the next step, the meter check.
The form for meter verification and tariff logic
Before a value is queried, the system must determine the type of meter. Based on the return value of the webhook (check_ht_nt.code), the form branches:
-
Code 1 (single-tariff meter): A simple query of the meter reading in kWh is performed.
-
Code 2 (dual-tariff meter): The AI chatbot asks separately for the main tariff (HT) and the off-peak tariff (NT).
-
Block: If the backend reports that no reading is currently possible for this meter (e.g. smart metering system), the process is terminated with a referral to the telephone customer service team.
Technical status codes
The terms 'Code 1' or 'Code 2' are technical response codes specified by the backend API. These codes instruct the chatbot to select the correct dialogue path (single-rate vs. dual-rate) in the form.
4. Meter check (third webhook)
| ⚙️ What happens: | The chatbot checks the status of the identified meter. |
| 🎯 Objective: | To ensure that the meter is ready for manual entries. |
| ✅ Result: | Decision on the next step in the process (approval for entry or notification of a block). |
This webhook acts as a 'technical gatekeeper'. Based on the response from this webhook, a conditional switch (based on the data from Webhook 2) decides whether users are permitted to enter the meter reading (and if so, which path is then taken) or whether the process is halted (e.g. if a smart meter is already transmitting the data automatically).
-
URL: example-url-middleware.com/abcdefghijk123456789/comparison
-
Enter the URL of a middleware here, which compares the user's data with the possible meter types (peak-rate meter, off-peak meter, gas meter, smart meter, etc.).
-
-
Method: POST
-
Body (Example): Custom
{
  "readings": "{{ json webhook_meter_check}}",
  "meter": "{{user_meter_number}}"
}
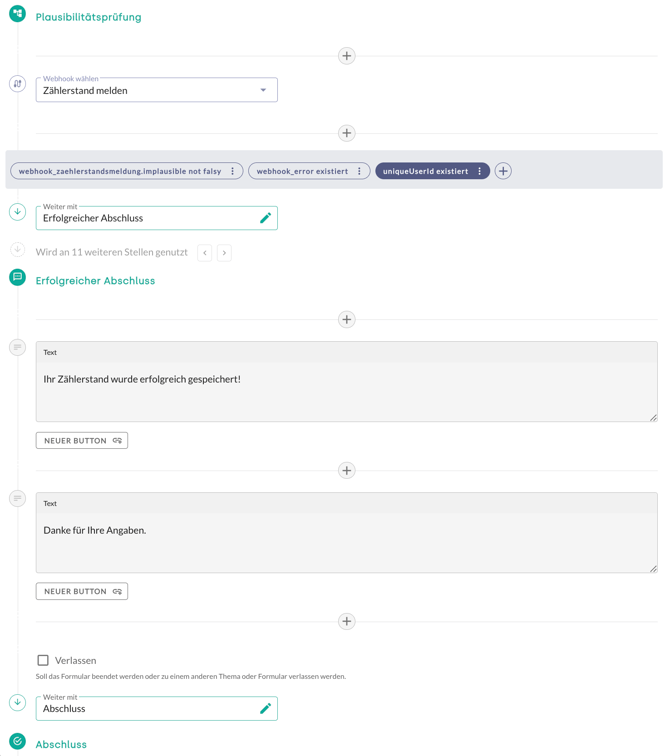
5. Submission and plausibility check (fourth & fifth webhooks)
Users are now prompted in the form to enter the new meter reading. The meter reading is sent directly to the company's IT system, where the plausibility check takes place. The system compares the entered value with historical data (e.g. the previous year's consumption). The system checks the value during transmission and immediately sends feedback to the chatbot (e.g. implausible: true or implausible: false).
-
What happens: The chatbot sends the meter reading to the system for posting.
-
The logic check: The chatbot checks the field
response.unplausiblevia a conditional switch. -
Objective: Direct entry of the value into the database.
-
Result: The system responds to indicate whether the posting was successful or whether the value is implausible.
-
Path A (Plausible): If the system reports 'OK' (
implausible: false), the user receives a success message. The process ends with the fourth webhook. -
Path B (Implausible): If the system reports that the value is implausible (e.g. extremely high additional consumption), the chatbot automatically redirects to the correction loop or asks for a reason (e.g. property vacant or meter replacement). The fifth webhook is triggered.
-
Path A: plausible input (fourth webhook)
| ⚙️ What happens: | If Webhook 3 says: "Everything OK (plausible)", this webhook is triggered. |
| ✅ Result: | The value is written directly to the company's database. |
If the variable implausible is flagged as "false" by the backend, the new meter reading is transmitted and the process is completed.
Once the meter readings have been collected and deemed valid, the actual purpose of the process takes place: the final transmission of the data to the backend. The security token from the authentication is used in the header to authorise the request.
-
Header:
-
Field: Authorization
-
Value: Bearer {{auth_response.jwt}}
-
-
Method: POST
-
Body (example): Custom
{
  "customerNumber": "{{user_kundennummer}}",
  "updateType": "meterReading",
  "value": "{{user_new_meter_reading}}"
}
When users enter the meter reading, the AI chatbot automatically fills in the placeholders from the context (memory) and sends the completed data package to the company.
If the user now enters the meter reading 4567, the chatbot automatically fills in the gaps from its memory (context) and sends the completed data to the backend.
Example:
{
  "customerNumber": "12345",
  "updateType": "meterReading",
  "value": "4567"
}
Path B: Invalid input (fifth webhook)
| ⚙️ What happens: | If Webhook 3 says: "Value is strange", but the user confirms: "It's correct anyway", this value is used. |
| 🎯 Special feature: | It also sends the reason (e.g. increased consumption) and uses Basic Auth ("portal") as well as the X-COS_UA header for identification. |
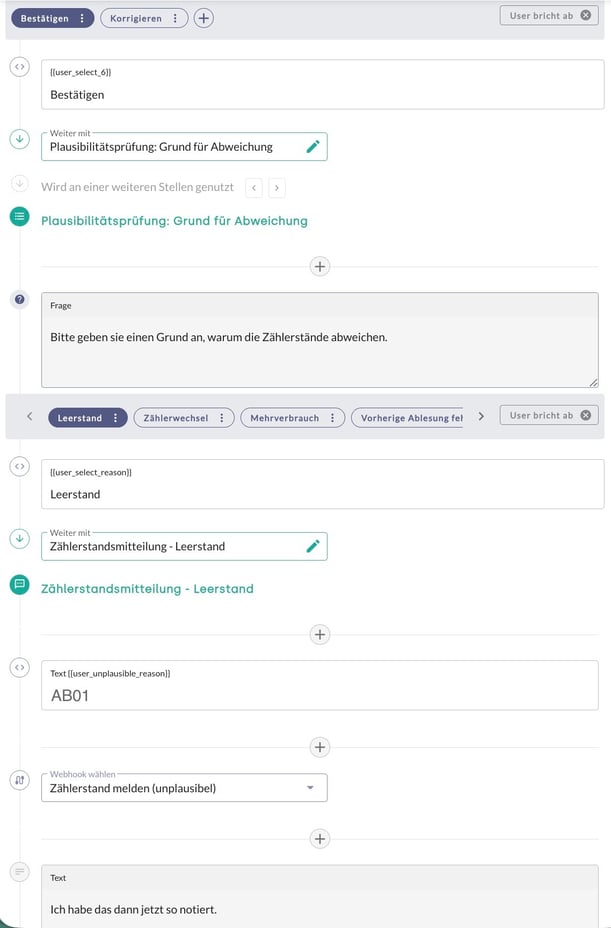
If the variable implausible is reported as 'true' by the backend, the chatbot detects a significant deviation from the previous year's consumption and responds in the form with a corresponding message via a conditional switch (condition: response.unplausible). Users are then given the options: correct the entry or confirm.
-
Correct: Users select this option if they suspect a typing error. The form returns to the meter reading entry screen.

-
Confirm: Users indicate that the value is correct despite the discrepancy. In this case, a special webhook titled "Report meter reading (implausible)" is triggered (fourth webhook). To do this, a structured reason must be selected via a multiple-choice element. Technical codes are stored in the background, enabling automated archiving in the company's database.
-
-
Vacancy (Technical code: AB01)
-
Meter replacement (Technical code: AB02)
-
Excess consumption (Technical code: AB03)
-
Previous reading incorrect (Technical code: AB04)
-
Once the meter readings have been collected and marked as implausible, the data is finally transmitted to the backend along with the information from Webhook 4 (which contains the security token from the authentication in the header for authorising the request)
The specific AB codes in this example are provided by the respective service provider's backend. It is essential that the response values entered in the form correspond exactly to these specifications so that the webhook can successfully transmit the reason.
Configuration of the fourth webhook
-
Context name: meter_reading_report_unplausibel
-
URL: https://workflow-example.your-server.com/webhook/a1b2-c3d4-example-id
-
Method: POST
-
Header:
-
Field: X-COS_UA
-
Value: MoinAI-Live
-
-
Body: Custom
{
  "number": "{{check_ht_nt.first_number}}",
  "contracts": [
    {
      "number": "{{check_ht_nt.second_number}}",
      "meterReadingDetails": [
        {
          "meter": "{{check_ht_nt.meter}}",
          "equipment": "{{check_ht_nt.equipment}}",
          "register": "{{check_ht_nt.register}}",
          "resultNew": {
            "confirmed": "true",
            "explanationHint": "{{user_unplausible_reason}}",
            "result": "{{user_meter-reading}}",
            "readingdateBilling": "{{check_ht_nt.time}}"
          }
        }
      ]
    }
  ]
}
-
Authentication: BasicAuth username + password
- Use cookies: enabled
Authentication via BasicAuth username + password
This webhook connects directly to the company's official portal system. As this involves sensitive contract data, Basic Auth (username + password) is mandatory.


Security best practices
-
Encryption: Using HTTPS ensures that data packets cannot be read by unauthorised parties whilst in transit to the server
-
Time limit: The JWT ensures that authentication remains valid only for the current session.